How to / Share or move your tree
How to prepare a GEDCOM for GEDmatch
Prepare the branch you intend to share, redact living people's details, review privacy limits, and validate the file before a GEDmatch upload.
Intermediate25 minutesChecked against the tools on 6 Sep 2026Uses Living Person Privatiser, Subtree Extractor and Dialect Report
prepare-a-gedcom-for-gedmatch.md, 9,151 characters. The same bytes answer at /how-to/prepare-a-gedcom-for-gedmatch.md.
Treat a GEDmatch upload as disclosure beyond your own computer. The toolkit's 2026-09-02 destination profile warns of public tree visibility. Check GEDmatch's current upload terms and audience before sending a tree; this article's 6 September tool check did not include a fresh GEDmatch upload or policy verification.
Keep an untouched backup and prepare a separate sharing copy. Renaming living people to Private does not remove their dates, addresses or names in notes, sources and media paths.
What causes the exposure
Do not rely on a destination's living-person filter as your only protection.
The Dialect Report profile flags people with a birth date and no DEAT structure as a possible LIVING conversion risk. That count comes from the local file. It does not reproduce GEDmatch's current algorithm or establish what happens to people with missing dates.
A phone number in a NOTE, a street address under RESI, an email in a citation or a media path can identify someone after you replace their name. Remove private content before uploading. A profile prediction that GEDmatch may ignore a field does not mean the service never receives or retains it.
Decide who counts as living and how much of the tree you intend to share. A smaller ancestor branch can support your research without disclosing unrelated branches. Extraction still retains the root and can carry private text from sources and header notes.

Diagram source
flowchart TD
  S["A tree you want on GEDmatch"] --> D{"Does GEDmatch need the whole tree?"}
  D -- "no, one line of descent" --> X["Subtree Extractor: cut the branch first"]
  D -- "yes" --> P["Living Person Privatiser"]
  X --> P
  P --> C{"Read Identifiers in free text"}
  C -- "rows listed" --> F["Turn on the free-text scan and rebuild"]
  C -- "none" --> B["Build the privatised file"]
  F --> B
  B --> V["Resolve verification failures and inspect the downloaded copy"]
  V --> R["Read the GEDmatch profile and current upload requirements"]
  R --> FMT["Convert only if required, then validate the final download"]
  FMT --> TEST["Test with synthetic or deceased-only data before the main upload"]
The run
The screenshots show fixtures/public/Musterstammbaum.ged, a 20-person Ahnenblatt example. Follow the counts and warnings for your own file; the classifier's date cutoff changes with time.
- Open Subtree Extractor and drop the file. The header line reads
20 people in 34 records. - Under Root person, use the Person select to pick whoever the DNA test belongs to. On this fixture that is
@1@ Max Mustermann, b. 1 JAN 1980. The Search box beside it filters by name, xref or year. - Under Walk, choose
Ancestors, set Generations up to your intended depth and leave Spouses and Siblings off unless you want those relatives too. Both options start off. An ancestor-only extract still includes its root, who may be living. - Read These settings include and inspect the people you intend to share. No file leaves your machine through this tool; you choose whether to upload its download later.
- Read Dropped so nothing points outside and Header the extract will carry. The extractor removes parsed pointers outside its record set, but retained notes and citations can name excluded people. The header includes the root name and source filename.
- Press Extract N records and keep the downloaded copy. Read encoding or ledger warnings, then load that download into the next tool.
- Open Living Person Privatiser on the extract. Read the living/dead split and the cutoff year. Do not switch back to the unextracted original by mistake.
- Read How each verdict was reached and review known living people plus the no evidence group. Leave People with nothing to go on set to
treated as livingunless you have evidence to change it.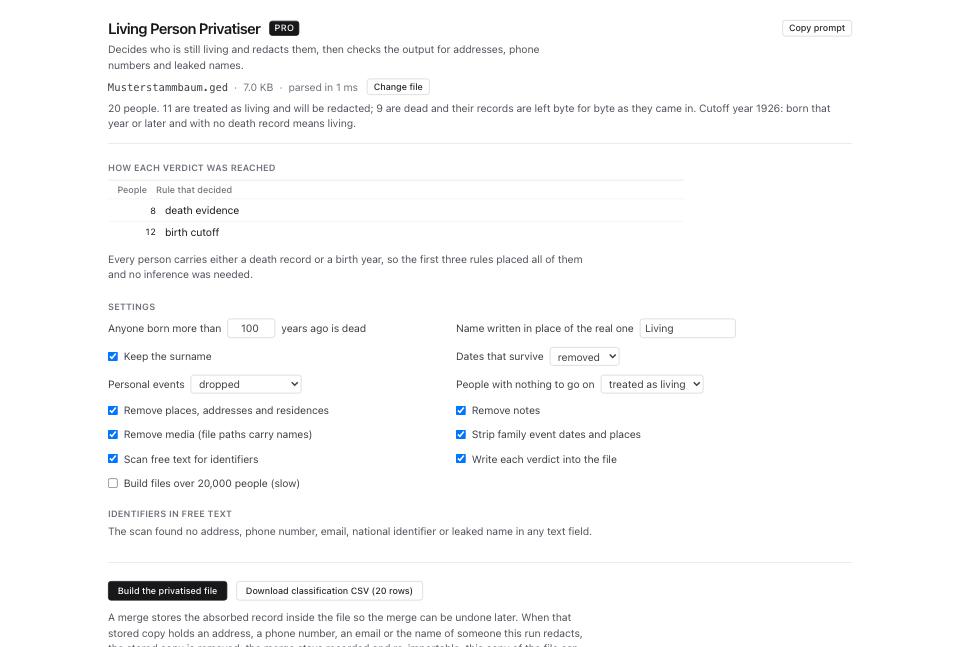
- Keep the surname starts checked. Untick it unless you intend to disclose those surnames. Keep dates removed, personal events dropped, and place, note, media, family-event and free-text protections enabled. See the full privacy workflow.
- Read Identifiers in free text, including hits outside redacted person records. The scanner uses supported patterns and can miss aliases, unusual identifier formats and indirect identification through family links.
- Press Build the privatised file. Resolve
Verify: failbefore sharing. A pass means the configured scan found no residuals; it does not prove anonymity. Click Download privatised .ged and inspect it. Keep Download classification CSV private because it contains original names and rationales. - Open Dialect Report and drop the privatised file. Read the GEDmatch card under Destination compatibility.
- Read
gedmatch.auto-livingas a local risk count, not a privacy test. Redaction can reduce this count by removing birth dates without changing the visibility of the retained person records. Read the rule's confidence and sources.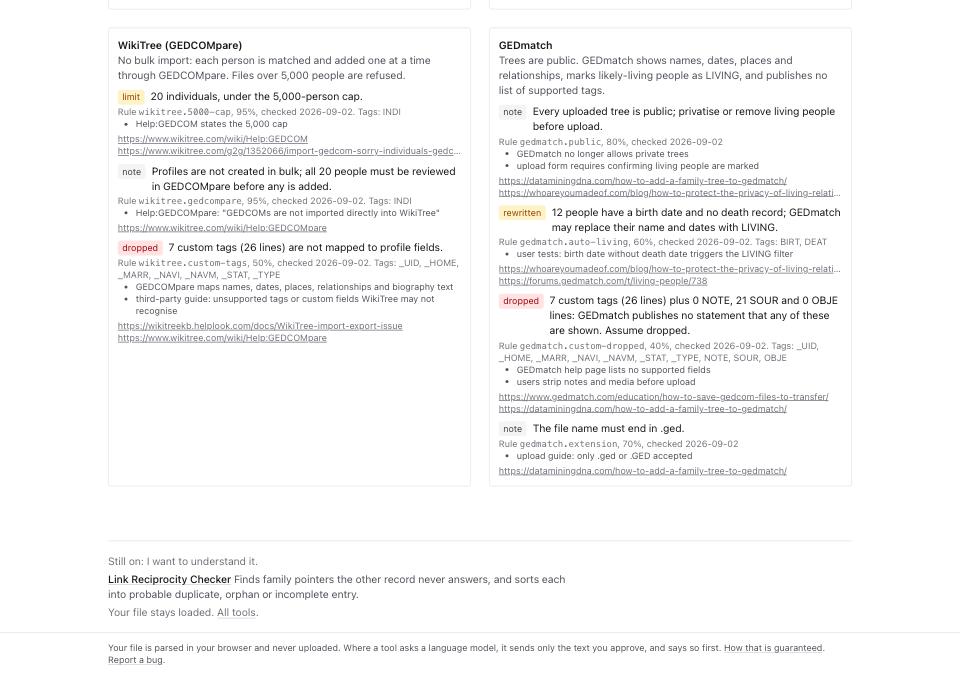
- Use a
.gedfilename and check current upload requirements. If a version conversion is necessary, review its losses, then validate the final download with GEDCOM Validator. Test a synthetic or deceased-only branch on GEDmatch before uploading your main sharing copy.
What to check when it worked
- The privatised file, opened in GEDCOM Viewer, shows no given name for anyone you meant to redact. Search the surname of a living relative and read the row.
- The build reports
Verify: pass.and you have reviewed names, aliases, notes, source text, paths, header details and retained relationships in the download. - You have accepted the risks listed in
gedmatch.custom-dropped. That low-confidence profile warning predicts possible loss; it does not establish deletion or confidentiality. - The subtree file holds the intended people. Its local count does not predict how many people GEDmatch will display.
- GEDCOM Validator reports no unexplained errors in the final file, and your test import matches the relationships and visibility you intended.
- The file name ends
.ged.
What to do when it did not
Someone living was left in the clear. Check that person's Rule and rationale. A wrong death event, old birth year, relative inference or changed batch setting can cause this. Use the no evidence filter for the batch group and leave it treated as living. Correct source-supported errors and review known living people after rebuilding.
Someone long dead was redacted. Read the classifier's rationale before changing anything. Our privatiser accepts DEAT Y without a date as death evidence, unless an earlier privacy flag takes precedence. The destination warning gedmatch.deat-y comes from a single dated report about GEDmatch and does not describe our classifier. Do not invent a death year to satisfy an importer.
The privatised file is larger than the original. Redaction writes a determination on each record saying which rule fired, so the decision travels with the file instead of living in this browser. Untick Write each verdict into the file if you would rather not carry it.
You want the full tree on GEDmatch. Review the entire sharing copy and confirm the current visibility terms first. The profile has low-confidence assumptions about unsupported tags. Read how to assess possible custom-tag losses and keep your original file and media.